

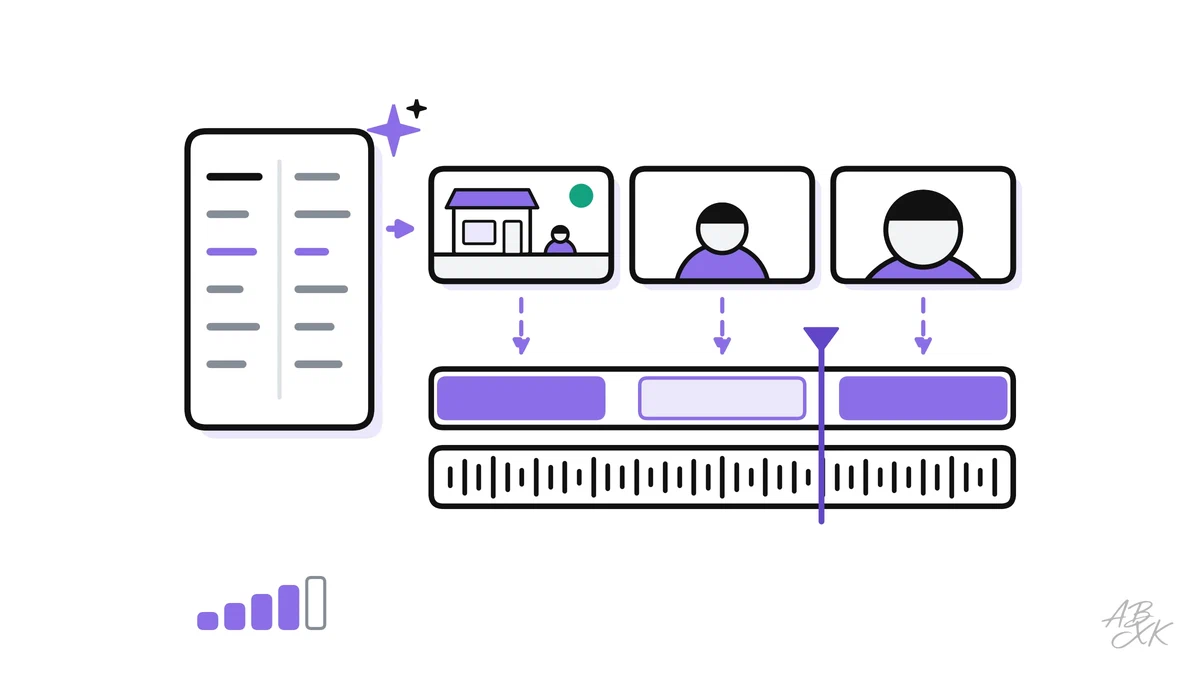
Type one sentence, and shortly afterward you have a video clip of a barista in a café at sunrise. Then you generate the second shot: the barista has a different face, and the cup has turned into a glass. A finished video needs more than good prompts. It needs a plan, shots that fit together, an edit with sound and a final check.
This is part 3 of Level 3 in our AI Productivity learning path. Here you take a short clip from script to release: script and shot list, one prompt per shot, consistent characters, edit and sound. You will also learn when an AI avatar is the better choice, where generated video fails and what to label. The part builds on your first AI image from Level 1.
Plan the video before you generate anything
A text-to-video tool turns a written description into a short video clip. Many tools also accept an image as the starting point; this is called image-to-video. One generation usually gives you one shot: a continuous piece of video between two cuts, often only a few seconds long. Some tools can extend a clip, but quality often suffers the longer it runs. So a 30-second video is a sequence of short shots, like a film.
That is why AI video works best as a small production in three phases. You plan the whole video, generate it shot by shot and finish it in an editor.
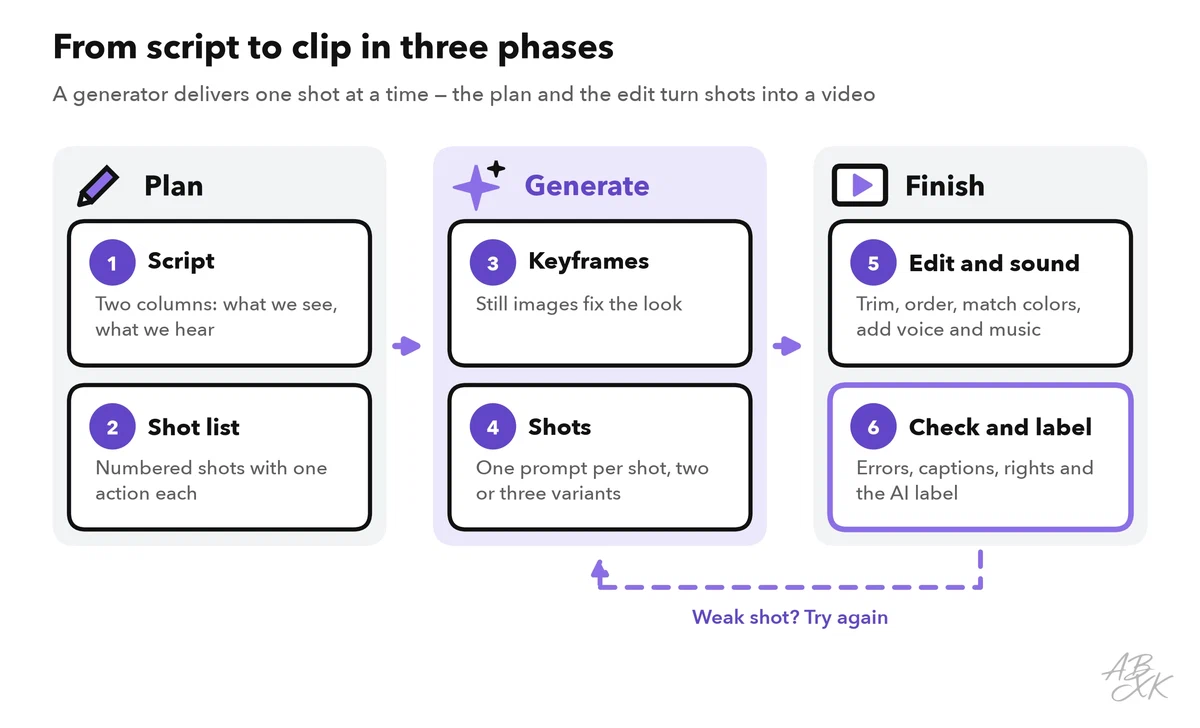
Give planning and finishing more time than generating: each generation takes a while and usually uses up credits or a quota. Decide on the format first, too: 16:9 for websites and presentations, 9:16 for vertical videos on phones. If you crop later, you lose part of the picture.
Planning also saves energy. Generating video is energy-intensive, and The Guardian names text-to-video prompts among the uses that are easy to skip when they serve no real purpose (Source: The Guardian, March 2026). A clear shot list means fewer generations that end up in the trash.
Write the script
Start with the message, not the pictures. Who watches the video, where, and what should viewers do afterward? Then write the script in two columns: what we see and what we hear. This classic format keeps picture and sound in step. Read the spoken part aloud with a stopwatch, because it sets the length of the video.
Turn the script into a shot list
A shot list breaks the script into numbered shots. Each row fixes what we see, what we hear, the length and how you will make the shot. Show one action per shot. “She pours the milk” works. “She pours the milk, serves the cup and waves” is three shots.
Not every shot has to be generated. Real product photos, a screen recording or a filmed handshake are often better and more honest. Generate what would be expensive or impossible to film: a mood, a place, an idea. In this invented example, a café announces new opening hours in a 20-second social clip:
| # | Shot | What we see | What we hear | Length | Made with |
|---|---|---|---|---|---|
| 1 | Wide shot, slow push-in | The café from the street at sunrise; the lights go on | Street sounds, music starts | 4 s | Text-to-video |
| 2 | Close-up | The barista pours milk into a cup | Voice: “Mornings start earlier now.” | 4 s | Image-to-video from a keyframe |
| 3 | Medium shot | She hands the cup across the counter and smiles | Voice: “From Monday, we open at 6:30.” | 4 s | Image-to-video from a keyframe |
| 4 | Close-up | Steam rises from the cup on the counter | Music | 3 s | Image-to-video from a keyframe |
| 5 | End card | Logo and opening hours as text | Voice: “See you tomorrow.” | 5 s | Editor, no AI |
Shot 5 follows a simple rule: text goes into the edit, not into a prompt. Video models can garble letters, and a typo in your opening hours is a real problem.
Write one prompt per shot
A good shot prompt reads like an instruction to a camera crew, from the camera move to the sound.
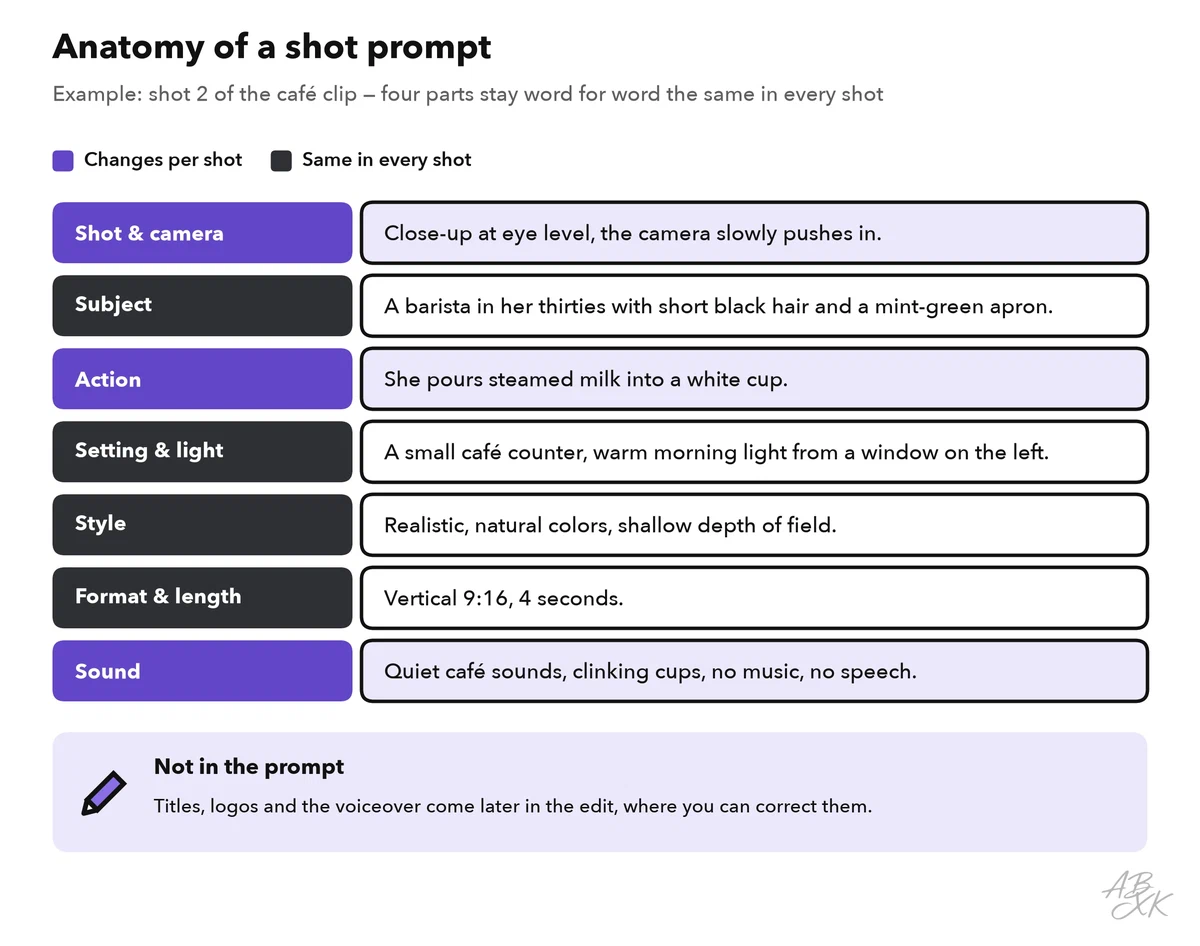
Three habits make the difference:
- Describe the motion. A prompt that only describes a picture gets random movement. Say what moves, where and how fast: “the camera slowly pushes in”, “steam rises”.
- Keep the fixed parts identical. Copy the character, the setting and the style word for word into every prompt of the video.
- Make variants, change one thing. Generate two or three variants per shot and keep the best. If none works, change one part of the prompt, just as with images. Save the prompt and settings of every shot you keep.
Video models understand the vocabulary of film. These words are a good start:
| Words | What the viewer sees | Use it for |
|---|---|---|
| Wide shot | The whole scene, people are small | The first shot of a scene: where are we? |
| Medium shot | A person from the waist up | Actions and gestures |
| Close-up | A face, a hand or an object fills the frame | Details and emotion |
| Static camera | The camera does not move | Calm shots that are easy to cut |
| Pan, tilt | The camera turns sideways or up and down | Showing a room or a tall object |
| Push-in, pull-out | The camera moves toward or away from the subject | Drawing attention, revealing the scene |
| Tracking shot | The camera follows a moving subject | Walking, driving, moving through a place |
Our comparison lists 11 text-to-video tools, and our ABXK Ranking of text-to-video generators shows which of them lead right now. These four are common starting points for generated scenes:




Short descriptions from our tool comparison, based on the vendors' information — not tested by ABXK.
Keep characters and style consistent
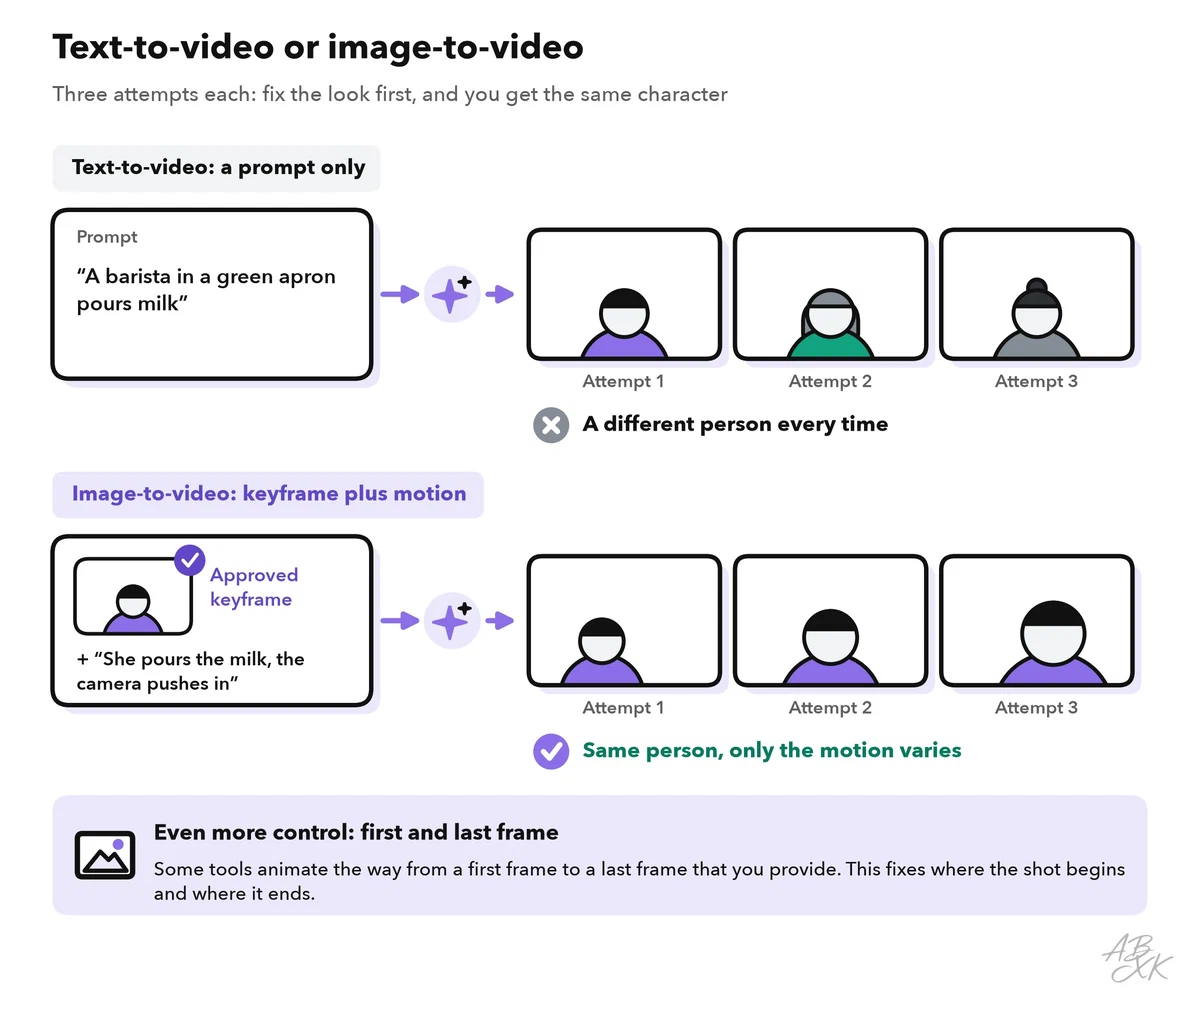
Every generation starts from scratch. Two prompts that describe “a barista in a green apron” give you two different people, often in different light. Viewers notice at once.
The most reliable fix is to separate the look from the motion. First, you create still images of the key moments in an image generator. These keyframes are quicker to make and to fix than video, and you approve them before anything moves. Then you animate each keyframe with image-to-video. The prompt now only describes the motion.
Four more techniques help:
- A character sheet: one clear image of each character, from the front and from the side, as the reference for every keyframe.
- Reference images and frames: many tools take pictures of a character, an object or a place as a guide. According to Google, Veo works with reference images and can animate from a first frame to a last frame that you provide. Luma is known for this kind of image-to-video, too.
- One style block: describe light, colors and look once, and paste the text unchanged into every prompt.
- One model per video: each model has its own look, so shots from mixed models do not match.
Then check by eye. Put all shots side by side on the timeline and compare faces, clothes and colors.
Edit the shots and add sound
Generated shots are raw material; the video is made in the editor. Place the shots in order and trim each one to its best seconds, because a generated clip is rarely good from start to end. Cut on movement, for example while the barista hands over the cup. Match brightness and color across shots. Add titles, names and numbers in the edit, where you can correct them.
Build the sound in three layers:
- Voice: the spoken part of the script, recorded by you or made with an AI voice.
- Music: a track whose license covers your use.
- Atmosphere and effects: street noise, the hiss of the coffee machine. Small sounds make generated pictures feel real.
Some models, such as Google Veo, create sound together with the picture, according to the vendor. Check that sound like the picture: does it fit, and do the lips match the words? Keep the voice clearly above the music. Part 4 of this level covers AI voice and music in depth. Captions and final checks are in the Level 2 part on how to edit audio and video with AI.
Avatar video or generative video?
Text-to-video tools come in two kinds. Generative video tools such as Google Veo, Runway, Kling AI and Luma create scenes, places and camera moves. In avatar video, a digital presenter, the avatar, speaks your script with matching lip movements. You pick a ready-made avatar or create one of a real person, with that person’s consent. The script is then almost the whole production.
| Avatar video | Generative video | |
|---|---|---|
| What you put in | A script, an avatar and a voice | One prompt per shot, often with a reference image |
| What you get | A presenter who speaks to the camera | Scenes, places, products and moods in motion |
| Typical uses | Training, how-to videos, internal updates, product explainers | Ads, social clips, B-roll, concept films |
| Consistency | The same presenter in every video, by design | Planned shot by shot with keyframes and references |
| Changes | Edit the script and render again | Generate the shot again, and it may look different |
| Other languages | Some tools translate the speech and match the lips | You add a new voice track in the edit |
| Main risks | Stiff delivery; a real person’s likeness needs consent | Physics errors, changing faces, garbled text |
| Examples | Synthesia, HeyGen | Google Veo, Runway, Kling AI, Luma |
According to the vendors, Synthesia creates avatar videos mainly for training and communication, and HeyGen translates videos with lip-sync into many languages.


Short descriptions from our tool comparison, based on the vendors' information — not tested by ABXK.
If someone needs to explain something that changes often or needs several languages, start with an avatar. To show a place, a mood or a product in motion, use generative video. Or combine them: the avatar explains, and generated B-roll, extra shots that illustrate what is said, shows it.
Where generated video still fails
Video models improve quickly, but some errors keep coming back, and many are easy to miss on a phone. Watch every shot at least once at full size and in slow motion.
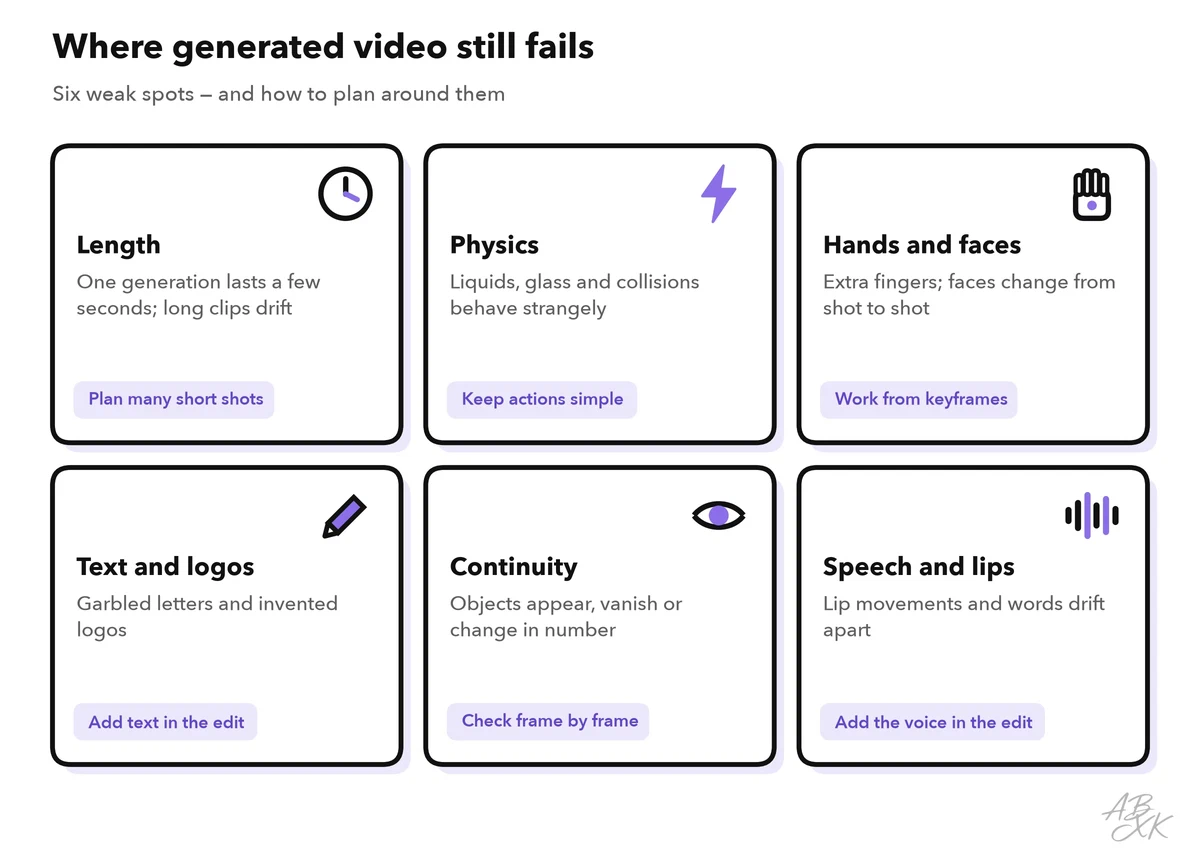
Plan around these limits:
- Keep shots short and simple: one subject, one action, a calm camera.
- Cut away before a movement goes wrong. Three good seconds beat six seconds with a glitch.
- Avoid close-ups of hands doing complex things, such as typing. Show the result instead.
- Animate real products from real photos, and compare every frame with the original. Models can change shapes, labels and buttons.
If a shot fails three times, rewrite it. A different angle or a simpler action usually beats more attempts.
Labels and rights before you publish
Labels. YouTube, for example, asks creators to disclose content that viewers could easily mistake for a real person, place, scene or event. Clearly unrealistic content, such as animation, needs no label, and neither does AI help with a script (Source: YouTube, “How we’re helping creators disclose altered or synthetic content”, 2024, blog.youtube). In the EU, the AI Act requires professional users who create a deepfake to disclose it. A deepfake is AI-made image, audio or video content that resembles real people, objects, places or events and would falsely appear authentic. For evidently artistic, satirical or fictional works, a disclosure that does not spoil the work is enough (Source: EU AI Act, Articles 3 and 50). Many generators also mark their output: Google says that videos made with Veo carry its SynthID watermark. Never remove such marks.
Rights. Four questions cover most cases:
- Do the tool’s terms allow your use? Commercial use depends on the tool and often on the plan.
- Did every real person agree? Create an avatar or a voice of a real person only with written consent, for an agreed purpose.
- Does the music license cover your channel?
- Who owns the result? In many countries, including the US and Germany, copyright protects only works created by people. The US Copyright Office concluded in 2025 that prompts alone do not make you the author of generated output. Your own work can still be protected: the script, the selection and arrangement of shots, and your edits (Source: US Copyright Office, Copyright and Artificial Intelligence, Part 2: Copyrightability, 2025, copyright.gov).
Use this checklist before every release:
| Check | Question to ask |
|---|---|
| Message | Does the clip say what the script says, and nothing more? |
| Consistency | Do faces, clothes, colors and light match across all shots? |
| Errors | Did you watch every shot slowly, at full size, for hands, physics and text? |
| Text | Are all titles, names, dates and numbers set in the edit and correct? |
| Sound | Is the voice clear, the music licensed and the mix even? |
| Captions | Are captions on, correct and in sync? |
| Label | Is the AI label set where the platform or the law requires it? |
| Rights | Do the tool’s terms allow your use, and is every consent on file? |