
A slide needs an illustration, a newsletter needs a header image, a social post needs something that catches the eye. Text-to-image tools create such pictures from a written description in seconds. But the first result is rarely the one you had in mind, and not every image you can generate is one you may use.
This is part 5 of Level 1 in our AI Productivity learning path. It applies the prompt building blocks from part 1 to pictures. You will learn the five parts of an image prompt, a small style vocabulary and how to refine a result. You will also see where typical errors hide and what to check about rights and labels before you publish.
How an image generator works
An image generator runs on an image model. In training, the model saw a huge number of pictures with their descriptions and learned which words go with which shapes, colors and styles. When you type a prompt, it does not search for an existing picture. It generates a new one that matches your words.
Two things follow. First, the model only knows what you write. Whatever you leave out, it fills in with something typical: the subject in the center, an average style, a random background. Second, because the model learned from existing images, a result can come close to existing works, logos or characters. That is one reason why rights matter.
You do not need a special tool for your first image: ChatGPT and Google Gemini create and edit images right in the chat. Specialized generators offer more control over style and details. Our comparison lists 13 text-to-image tools, and our ABXK Ranking of text-to-image generators shows which of them lead right now.



Short descriptions from our tool comparison, based on the vendors' information — not tested by ABXK.
The five parts of an image prompt
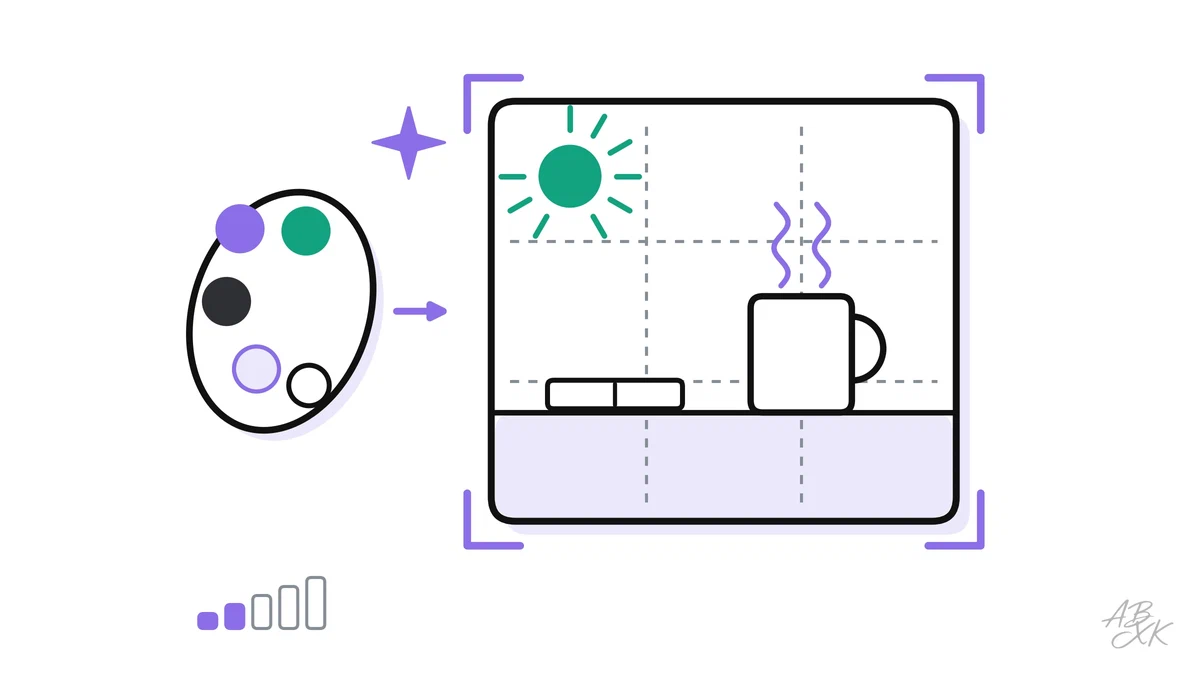
A good image prompt answers five questions: What is in the picture? What should it look like? How is it framed? How is it lit? And which shape does it have?
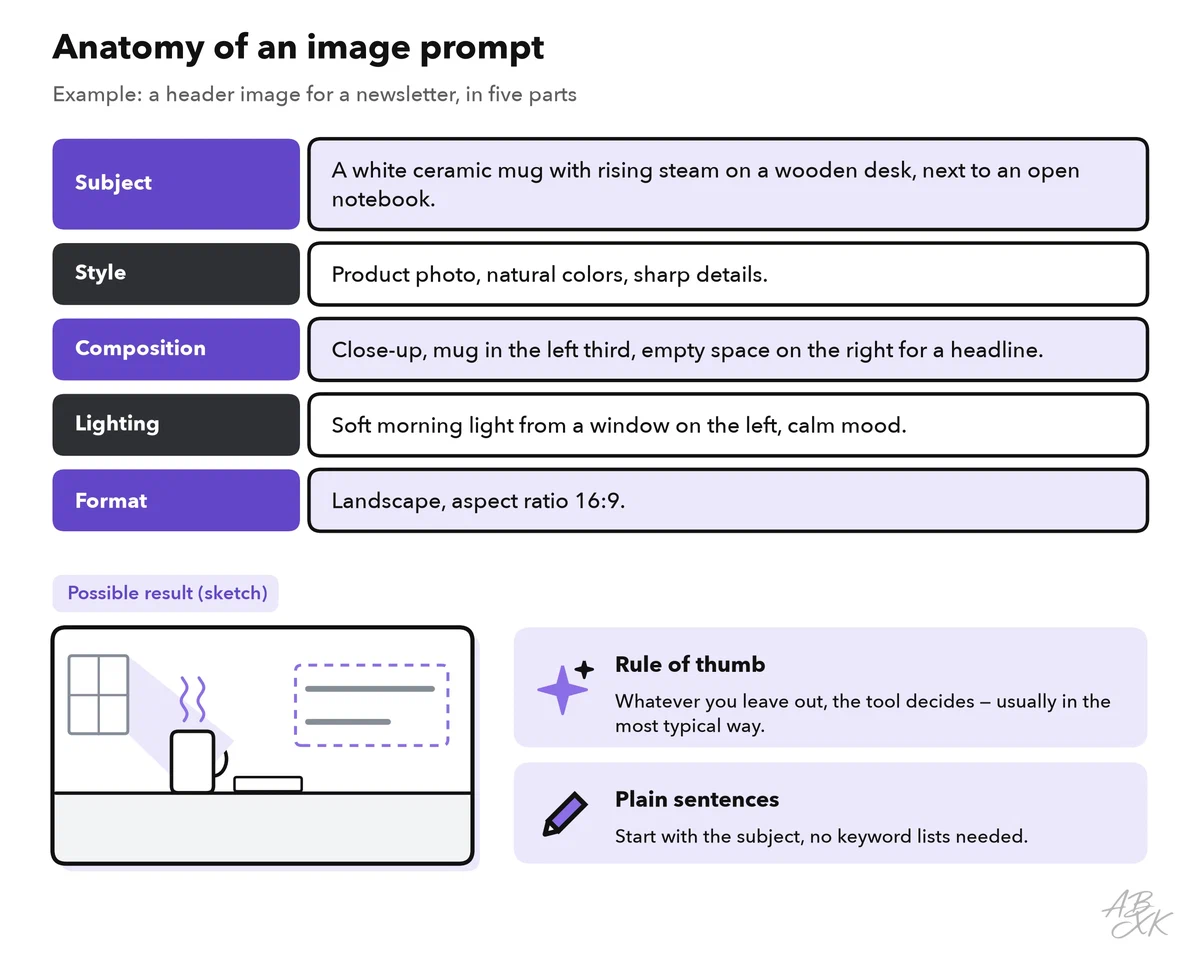
- Subject: what is in the picture, with concrete details. “A white ceramic mug with rising steam” works better than “a coffee mug”.
- Style: the look, such as a photo, a flat illustration or a 3D render.
- Composition: close-up or wide shot, from above or at eye level, where the subject sits and where space stays empty.
- Lighting and mood: soft daylight, warm evening light or studio light; calm, cheerful or dramatic.
- Format: the aspect ratio, the relation of width to height: 16:9 is wide, 1:1 is square, 9:16 is tall.
Write the parts as plain sentences, starting with the subject. You do not need long chains of keywords.
Some tools also have a field for what you do not want, called a negative prompt (in Midjourney: --no text). Otherwise, describe what should be there: “a plain white wall” works better than “no posters on the wall”.
Style words that change the picture
Style is where a few words make the biggest difference. These keywords are a good starting point:
| Style | Keywords to try | Works well for |
|---|---|---|
| Photo | “product photo”, “portrait photo”, “shallow depth of field” | Products, food, places |
| Illustration | “flat illustration”, “line drawing”, “watercolor” | Blog headers, explainers |
| 3D | “3D render”, “clay style”, “isometric view” | Icons, product ideas |
| Graphic design | “minimalist poster”, “sticker”, “bold shapes” | Social posts, invitations |
| Hand-drawn | “pencil sketch”, “charcoal drawing”, “oil painting” | Cards, mood boards |
Add one word for the light (soft daylight, golden hour, studio light, backlight) and one for the viewpoint (close-up, wide shot, bird’s-eye view, low angle), and the same subject looks completely different.
Choose the format before you generate
Decide where the image will appear before you write the prompt. A slide needs a wide image, a story on a phone a tall one. If you crop a square image to 16:9 later, you may cut off part of the subject.
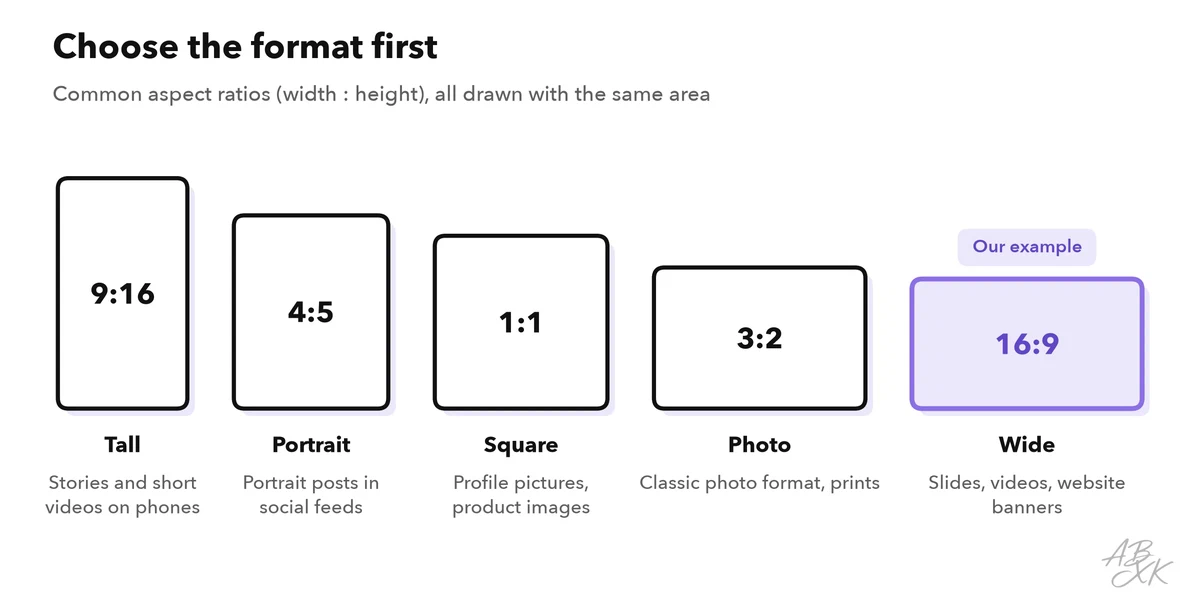
In a chat assistant, you write the format into the prompt: “Format 16:9”. Midjourney uses a parameter such as --ar 16:9, and in Canva you pick the aspect ratio before you generate, according to the vendor. If your tool does not offer the ratio you need, choose the closest one and crop with care.
Plan for text, too. If a headline will go on the image, ask for “empty space on the right” and add the words later in a design tool. Level 3 uses the same formats for AI video.
Refine step by step instead of starting over
Your first prompt is a starting point. Many tools return several variants at once, and in a chat assistant you can ask for another version. Pick the one closest to your idea and improve it in small steps.
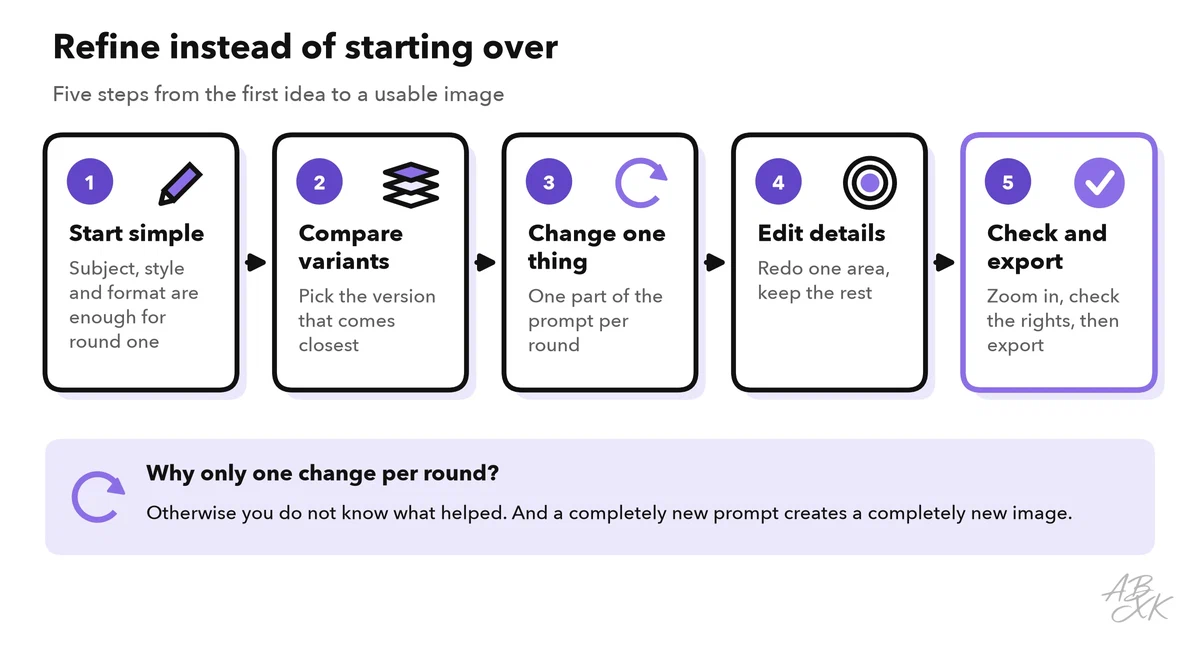
Change one part of the prompt per round. If you change light, style and background at once, you do not know which change helped. And when a result is almost right, do not start over: a new prompt creates a completely new image, and the good parts are gone.
Edit the details instead. In ChatGPT or Gemini, you describe the change in the chat: “Make the background lighter. Keep everything else the same.” Many tools also let you select an area and regenerate only that part, which is called inpainting. Generative Fill in Photoshop, powered by Adobe’s Firefly models, works this way. Outpainting does the opposite: it extends an image beyond its edges, for example when you need a wider format.
Common problems and where to look for them
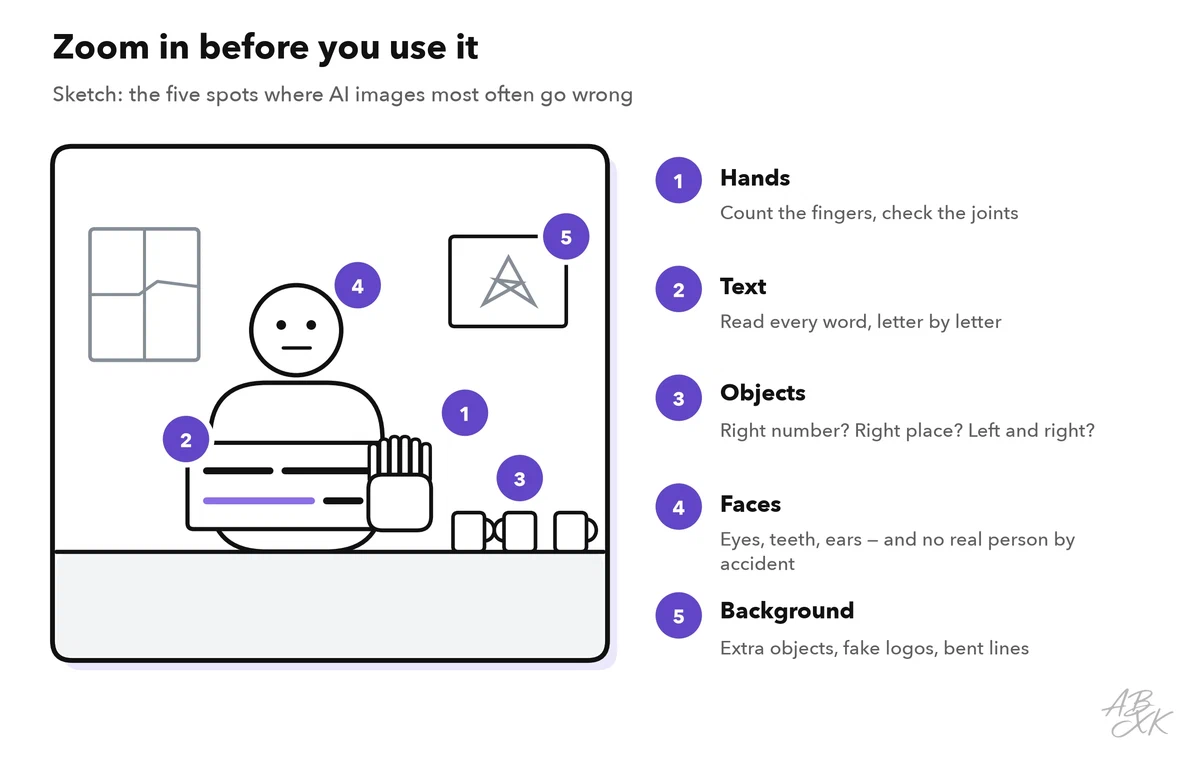
Image models have improved a lot, but some errors keep coming back. A picture that looks fine as a small preview can show strange details at full size, so always zoom in before you use it.
| Problem | What you see | What helps |
|---|---|---|
| Hands | Six fingers, fingers that merge or bend the wrong way | Show hands doing something simple, keep them out of the frame or edit only the hand |
| Text in the image | Misspelled words, letters that do not exist | Put the exact words in quotes and keep them short, or add the text later in a design tool |
| Counts and positions | Four cups instead of three, left and right swapped | Ask for fewer objects, then fix the rest with an edit |
| The same person in several images | The face changes from image to image | Use a reference image or a feature for consistent characters, if your tool has one |
| Unwanted extras | Odd objects, fake logos, bent lines in the background | Describe the background precisely and remove extras with an edit |
| Generic look | Smooth, interchangeable “stock photo” style | Add concrete details, a clear style word and a lighting word |
Some tools focus on exactly these weak spots. According to the vendors, Ideogram is known for accurate text inside images, and Recraft exports editable vector graphics, which is useful for logos and icons.
Rights and labels: check before you publish
Generating an image is easy. Whether you may use it depends on the tool’s terms, the rights of other people and the rules for labeling.
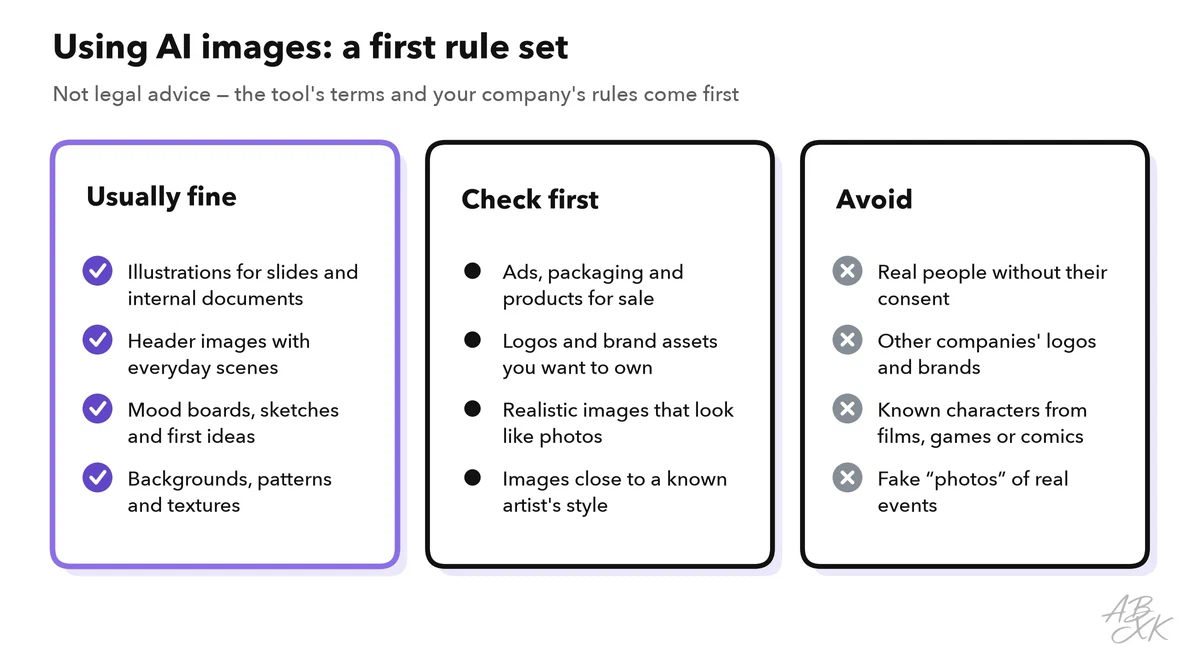
The tool’s terms. They say whether you may use images commercially and who holds which rights. They differ between tools and sometimes between free and paid plans. Read them before you use an image in an ad, on a product or in a client project, and follow your company’s rules on approved tools. Adobe, for example, says its own Firefly models are trained on licensed and public-domain content and calls them safe for commercial use. This does not cover the partner models that Firefly also offers.
Copyright in the result. In many countries, including the US and Germany, copyright protects only works created by people. An image that comes from a prompt alone may have no copyright protection at all. In 2023, the US Copyright Office registered a comic book’s text and arrangement, but not the Midjourney images in it (Source: US Copyright Office, decision on “Zarya of the Dawn”, 2023, copyright.gov). This is a real risk for logos and other brand assets: talk to a designer or a lawyer before you build a brand on a generated image.
Labels. Say when an image is AI-generated, at least when it could pass for a real photo. In the EU, the AI Act requires professional users who create a deepfake to disclose that the content was generated or manipulated by AI. A deepfake is an AI-made image, audio or video that resembles real people, objects, places or events and would falsely appear authentic (Source: EU AI Act, Articles 3 and 50). Many social platforms also ask you to label realistic AI content. Some tools mark their images with invisible watermarks or with Content Credentials, metadata based on the C2PA standard. Do not remove these marks. Our AI Security section shows how to recognize deepfakes.
Exercise: a header image in four rounds
Try the whole process with a real need, such as a header image for your next newsletter. A typical session starts with a short prompt — subject, style and format only — and ends with the full prompt from the anatomy figure:
| Round | What you notice | What you change |
|---|---|---|
| 1 | The mug sits in the center, there is no room for a headline | Add “mug in the left third, empty space on the right” |
| 2 | The light looks flat and gray | Add “soft morning light from a window on the left” |
| 3 | A strange logo appears on the mug | Edit only the mug: “plain white mug, no print” |
| 4 | The image works | Check it at full size, export it as 16:9, add the caption “Image: AI-generated” |