

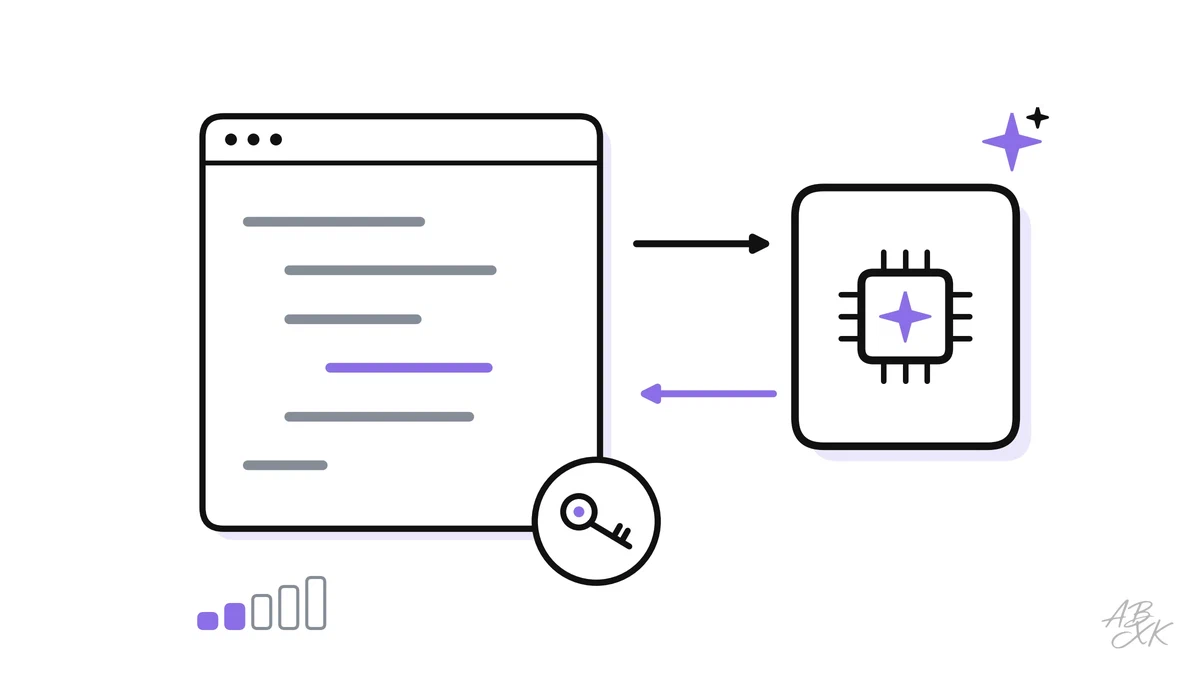
Chat apps are the easiest way to use a large language model. But maybe you want AI inside your own software: a support form, a report generator or a small internal tool. Then your program has to talk to the model directly, through its API (application programming interface). Your code sends a request, and the answer comes back as data that your program can use.
This is part 1 of Level 1 in our AI Development learning path. You will create an API key, store it safely, send a first request in Python, read the response and handle errors. If tokens and context windows are new to you, start with APIs, Tokens and Context Windows Explained from Level 0.
What happens during an API call
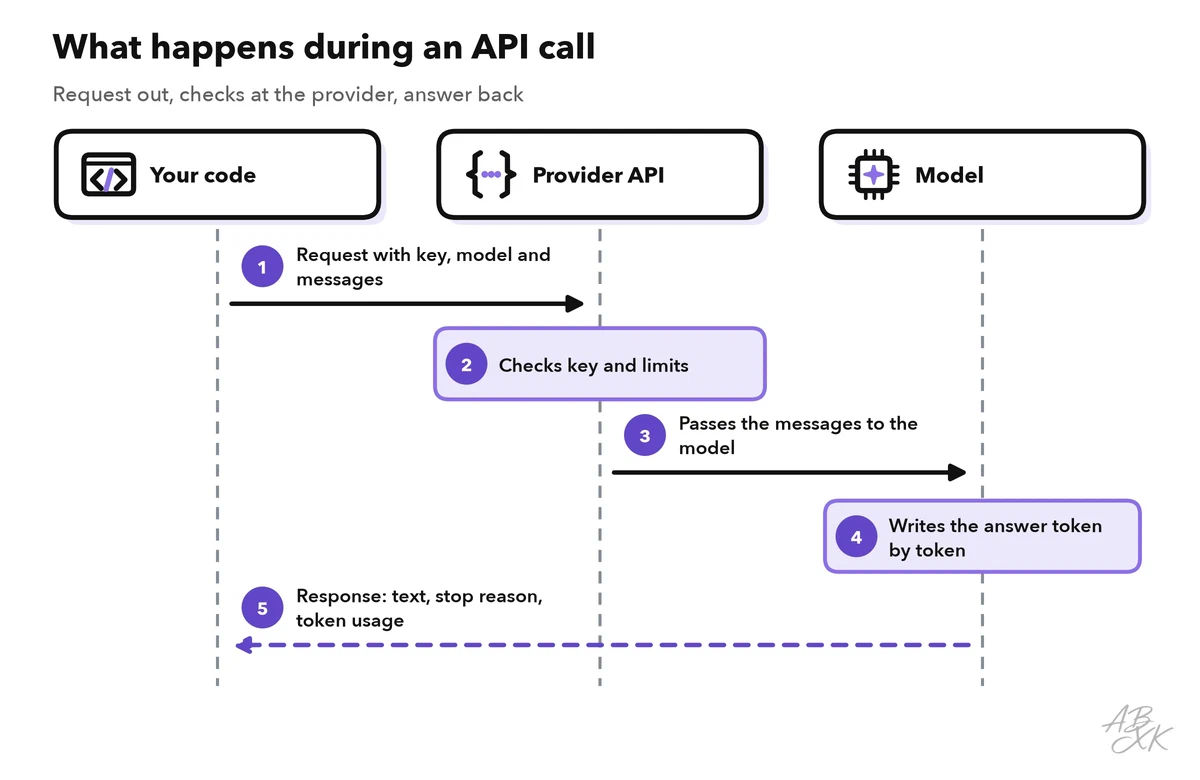
An API call is a short exchange between two programs over the internet. Your program sends a request to a fixed web address, the endpoint. The provider’s server checks your key and your limits, passes your messages to the model and returns a response. Request and response are written in JSON, a simple text format of names and values that almost every programming language can read.
With a typical chat API, the model does not remember earlier calls. Each request must contain everything the model needs: the instructions, the question and, in a conversation, the earlier messages that matter. This sounds like extra work, but it also makes your app predictable: the model sees exactly what you send.
Step 1: Get an API key and keep it out of your code
An API key is a long secret string that identifies you to the provider. Every request with your key is billed to your account, so treat it like a password.
- Open the developer console of a model provider, create an account and set up billing.
- Create a new key with a clear name, such as “faq-bot-dev”, so you know later where it is used.
- Copy the key right away. Many consoles show it only once.
- Store it in an environment variable: a named value that lives in your system or in your hosting settings — not in your source code.
On macOS or Linux, you set the variable for the current terminal session like this:
export LLM_API_KEY="paste-your-key-here"
On Windows, in PowerShell:
$env:LLM_API_KEY = "paste-your-key-here"
In projects, many developers keep keys in a local file called .env and load it with a small library. Add .env to your .gitignore file so the key never ends up in version control.
Step 2: Build the request
A request has three parts: where it goes, who sends it and what it asks for.
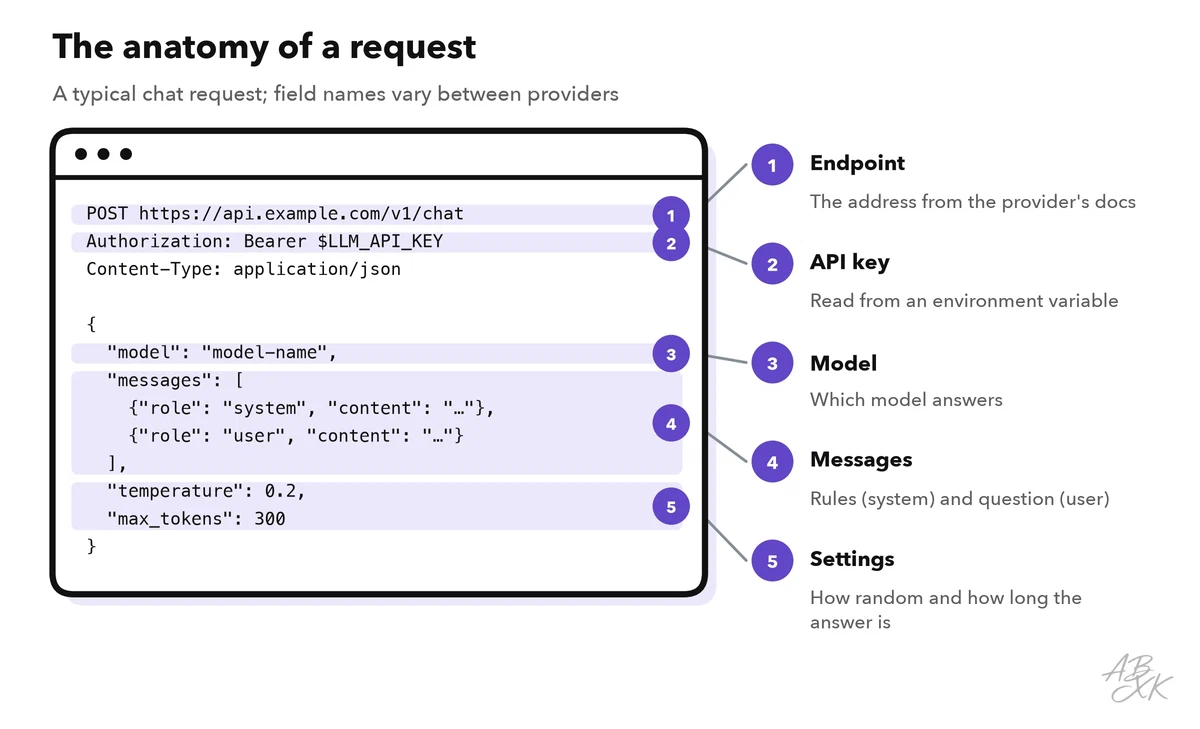
- Endpoint and method. The web address comes from the provider’s documentation. You send data with the HTTP method POST.
- Headers. Extra lines that travel with the request: your API key and the content type
application/json. Many providers expect the key asAuthorization: Bearer …; others use a header with a different name. - Body. The JSON with the model, the messages and the settings.
Each message has a role. The system message holds rules for the whole conversation. User messages hold the input. Assistant messages hold earlier answers of the model. Part 2 of this level, Prompt Design for Developers, shows how to write them well.
The settings control how the model answers. These are the ones you will use most:
| Setting | What it does | A good start |
|---|---|---|
| model | Picks the model that answers | A mid-size model of your provider |
| messages | System rules, user input, earlier answers | One system and one user message |
| temperature | Randomness: low = focused and repeatable, high = more varied | 0–0.3 for facts and data, higher for ideas |
| max tokens | Upper limit for the length of the answer | Enough for your longest normal answer |
| stream | Sends the answer in small pieces while it is written | Off in scripts, on in chat interfaces |
| stop | Text at which the model stops writing | Only if you need it |
Names and ranges differ between providers, and some models — reasoning models in particular — do not accept every setting. The API reference of your provider lists what each model supports.
Step 3: Send your first request
Here is the request as plain HTTP. api.example.com and model-name are placeholders: use the endpoint and the model ID from your provider’s documentation.
POST https://api.example.com/v1/chat
Authorization: Bearer <your key from LLM_API_KEY>
Content-Type: application/json

{
  "model": "model-name",
  "messages": [
    {"role": "system", "content": "Answer in plain English, in at most three sentences."},
    {"role": "user", "content": "What is an API key?"}
  ],
  "temperature": 0.2,
  "max_tokens": 300
}
The same call in Python, with the popular requests library (install it with pip install requests):
import os
import requests

API_KEY = os.environ["LLM_API_KEY"]        # read the key from the environment
URL = "https://api.example.com/v1/chat"    # your provider's endpoint

payload = {
    "model": "model-name",
    "messages": [
        {"role": "system", "content": "Answer in plain English, in at most three sentences."},
        {"role": "user", "content": "What is an API key?"},
    ],
    "temperature": 0.2,
    "max_tokens": 300,
}

response = requests.post(
    URL,
    headers={"Authorization": f"Bearer {API_KEY}"},
    json=payload,      # sends the body as JSON and sets the content type
    timeout=30,        # never wait forever
)
response.raise_for_status()   # stop with an error message if the call failed
print(response.json())
Most providers also offer official libraries, called SDKs (software development kits), that wrap these steps into a few lines. They are convenient, but the structure underneath stays the same. Even open-weight models that you run yourself, for example on a GPU cloud such as Runpod, usually offer the same kind of chat endpoint, so your code barely changes.
Step 4: Read the response
The response is JSON as well. Its exact layout depends on the provider, but you will find the same four kinds of information.
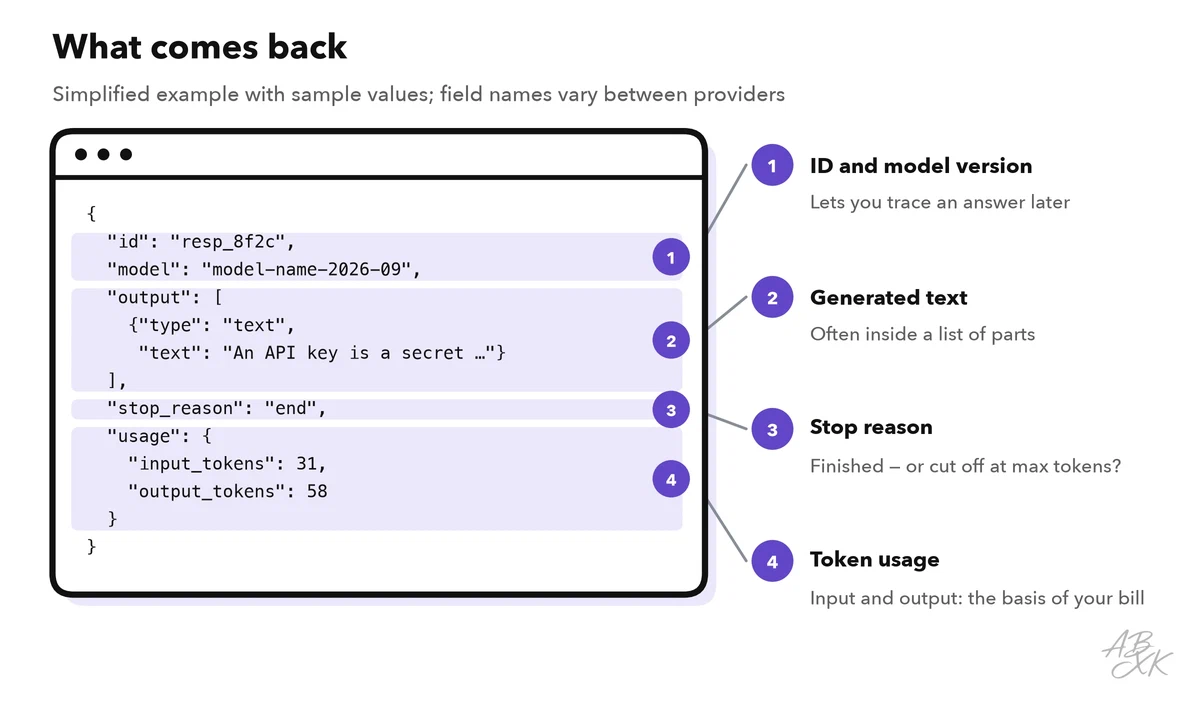
- The generated text. It sits in a field such as
contentortext, often inside a list, because a response can have several parts. - The stop reason. It tells you whether the model finished normally or hit your max tokens limit. If it hit the limit, the answer is cut off. Raise the limit or ask for a shorter answer.
- Token usage. The number of input and output tokens. Providers bill per token, so log these numbers from day one.
- ID and model version. You need them to trace a strange answer later.
The model field decides who answers. Our LLM database lists 343 models with release dates and test results. Here are a few current models from different providers:
| Model | Released | Weights | ECI | Rank |
|---|---|---|---|---|
| Claude Sonnet 5.5 Anthropic | Sep 28, 2026 | closed | 164.4 | 6 |
| GPT-6 Luna OpenAI | Sep 22, 2026 | closed | 156.3 | 28 |
| Gemini 3.8 Flash Google DeepMind | Sep 2, 2026 | closed | 157.2 | 19 |
| DeepSeek V4.1 Flash DeepSeek | Sep 9, 2026 | open | 155.6 | 31 |




ECI = Epoch Capabilities Index, one overall score across many benchmarks; rank among all models with an ECI. Data: Epoch AI, retrieved on October 17, 2026, licensed CC BY 4.0. All models: LLM database.
The names in our database are display names. The exact model ID for your request is in the provider’s documentation. Part 4 of this level explains how to choose a model for your app.
Step 5: Handle errors and retry the right way
Calls fail. The network drops, the provider is overloaded or your request contains a mistake. The status code of the response tells you which case you have. Codes in the 200s mean success; everything else needs a reaction:
| Status code | Usual meaning | What to do |
|---|---|---|
| 400 | Bad request: wrong field, invalid JSON, input too long | Fix the request; do not retry |
| 401 / 403 | Key missing, wrong or without permission | Check the key and its rights |
| 404 | Unknown endpoint or model ID | Check the address and the model ID |
| 429 | Too many requests, or a usage limit reached | Wait, then retry; check your limits |
| 500 / 503 | Error or overload at the provider | Wait, then retry |
| Timeout | No answer in time | Retry once or twice, then stop cleanly |
The rule behind the table: retry what is temporary, fix what is permanent.
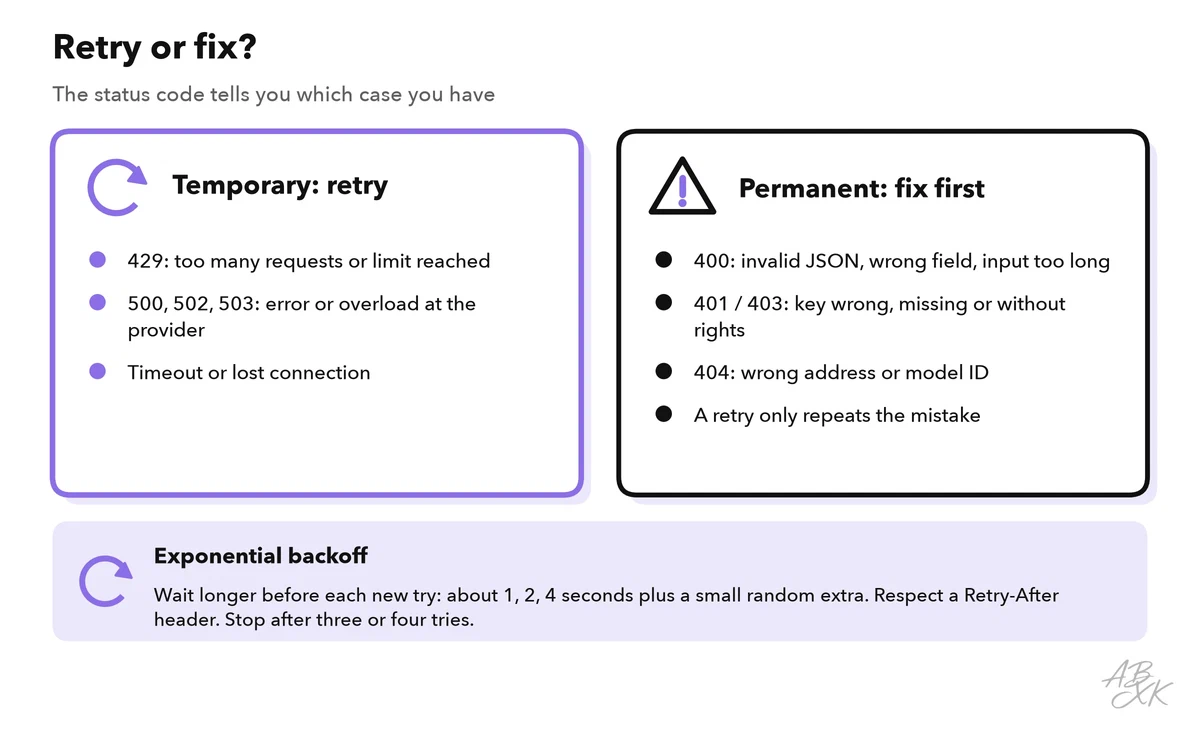
When you retry, wait a little longer each time — for example about 1, then 2, then 4 seconds, plus a small random extra. This pattern is called exponential backoff. The random part stops many clients from retrying at the same moment. If the response has a Retry-After header, wait at least that long. After three or four attempts, give up and show the user a clear message.
import random
import time

import requests

def post_with_retry(url, headers, payload, tries=4):
    for attempt in range(tries):
        try:
            r = requests.post(url, headers=headers, json=payload, timeout=30)
            if r.status_code != 429 and r.status_code < 500:
                r.raise_for_status()   # 400, 401, 403, 404: fix the request, no retry
                return r.json()
        except (requests.exceptions.Timeout, requests.exceptions.ConnectionError):
            pass                       # network problems are temporary, too
        if attempt < tries - 1:        # no pause after the last attempt
            time.sleep(2 ** attempt + random.random())   # about 1, 2, 4 seconds
    raise RuntimeError("The API still fails after several attempts.")
Exercise: your first call in 20 minutes
Prefer not to write code? No-code platforms such as MindStudio build on the same models, and you do not write these calls yourself. Part 3 of this level shows how to build a simple AI app without code.