

Your script from part 1 works on your laptop. To let other people use it, it has to run on the internet — without exposing your API key, without inviting abuse and without a surprise bill. Putting software on a server so that people can reach it is called deployment.
This is part 5, the last part of Level 1 in our AI Development learning path. You will set up the simplest sound architecture for a small AI web app: a static page and one serverless function. You will learn where the API key lives, how to limit requests and costs, how to use your own domain with HTTPS and what to watch after launch. The guide builds on your first LLM API call and on the parts of an AI app from Level 0.
The architecture: a static page and one function
A small AI web app needs only two parts of its own:
- The static frontend: HTML, CSS and JavaScript files that the server delivers unchanged — your page with the chat window. Hosting platforms usually serve such files from a CDN (content delivery network): servers in many places that keep copies of your files close to your visitors.
- A serverless function: a small piece of backend code that the platform runs only when a request arrives. You do not manage a server. The platform starts the function, runs as many copies as needed and stops them again. This function is the only part that knows the API key and talks to the model.
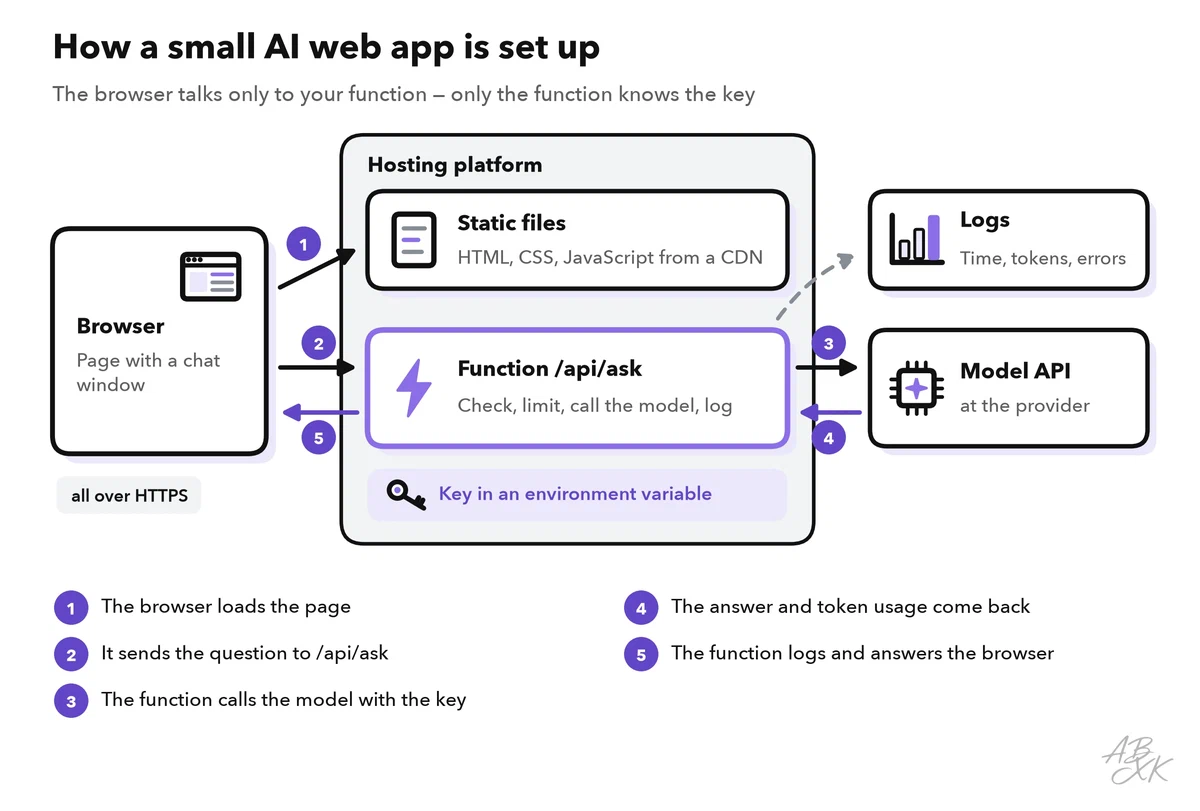
The browser never talks to the model provider directly. Anything that runs in the browser can be read by every visitor, and a key in the page would be found quickly. You can also run both parts in other places. These are the three common options:
| Option | What you manage yourself | A good fit when |
|---|---|---|
| Hosting platform with functions | Your code and the settings | Small apps and prototypes with light to moderate traffic |
| Your own server with a control panel | The server, updates, security and certificates | You already run servers or need full control |
| GPU cloud for your own model | The model server as well | You run an open-weight model instead of using a provider’s API |
According to the vendors, Netlify is a platform for building, deploying and hosting websites and web apps. Plesk is a control panel for websites, DNS and databases on your own server. Runpod is a GPU cloud for running AI models, billed by usage. More options are listed in our tool comparison. We have not tested these tools.



Short descriptions from our tool comparison, based on the vendors' information — not tested by ABXK.
Step 1: Write the function
The function receives the question, checks it, calls the model and sends back only the answer. The example follows the format of Netlify Functions, which use the web-standard Request and Response objects. Other platforms use very similar code, but the file location and some settings differ.
// netlify/functions/ask.mjs
const SYSTEM_PROMPT = "You answer questions about our coworking space. ...";
const reply = (body, status = 200) => Response.json(body, { status });

export default async (req) => {
  if (req.method !== "POST") return reply({ error: "Use POST." }, 405);

  // 1. Check the input before anything costs money
  const body = await req.json().catch(() => null);
  const question = typeof body?.question === "string" ? body.question.trim() : "";
  if (!question || question.length > 1000) {
    return reply({ error: "Please ask a question of up to 1,000 characters." }, 400);
  }

  // 2. Limit requests per visitor (see step 3)

  // 3. Call the model: key and model from the environment, token limit, timeout
  const started = Date.now();
  let status = 0;
  let data = null;
  try {
    const res = await fetch("https://api.example.com/v1/chat", {
      method: "POST",
      headers: {
        "Authorization": `Bearer ${process.env.LLM_API_KEY}`,
        "Content-Type": "application/json",
      },
      body: JSON.stringify({
        model: process.env.LLM_MODEL,
        messages: [
          { role: "system", content: SYSTEM_PROMPT },
          { role: "user", content: question },
        ],
        max_tokens: 300,
      }),
      signal: AbortSignal.timeout(20000),   // give up after 20 seconds
    });
    status = res.status;
    data = await res.json();
  } catch {
    // timeout, network error or a response that is not JSON
  }

  // 4. Check the answer (field names as in part 1; they vary by provider)
  const answer = data?.output?.[0]?.text;
  const ok = status === 200 && typeof answer === "string" && answer !== "";

  // 5. Log what you need for errors and costs, but not the question, then reply
  console.log(JSON.stringify({ status, ok, ms: Date.now() - started, usage: data?.usage }));
  if (!ok) return reply({ error: "The assistant is not available right now." }, 502);
  return reply({ answer });
};

export const config = { path: "/api/ask" };
The page calls only this function, never the provider:
const res = await fetch("/api/ask", {
  method: "POST",
  headers: { "Content-Type": "application/json" },
  body: JSON.stringify({ question }),
});
const { answer, error } = await res.json();
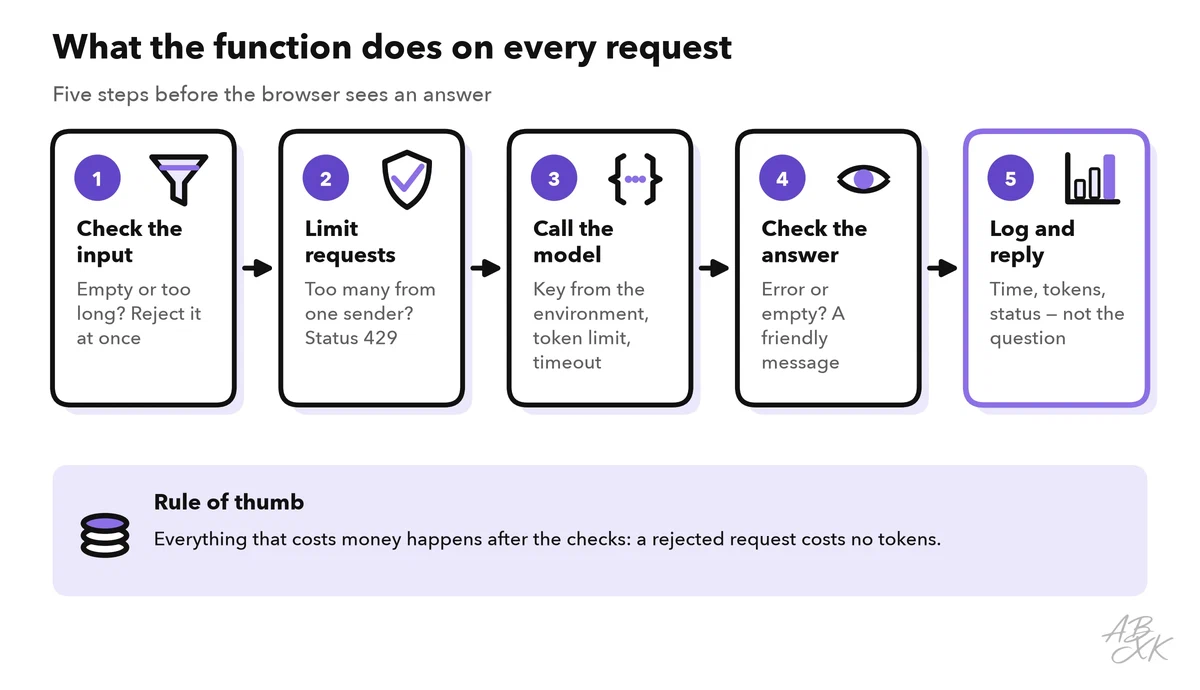
Two details matter in practice. First, error messages to the browser stay general. Details such as the provider’s error text belong in your logs, not on the screen. Second, platforms limit how long a function may run. On Netlify, a normal function may run for 60 seconds, according to its documentation. Your own timeout should be clearly shorter, so that you can still send a friendly message.
Step 2: Keep the key in an environment variable
In the settings of your hosting platform, create the environment variables LLM_API_KEY and LLM_MODEL. The function reads them at runtime, so neither value appears in your code. On Netlify, for example, you set them in the dashboard or the command line, and a changed value takes effect with the next deploy.
- Never put the key into the repository, into frontend code, into logs or into error messages.
- Use a separate key for this app, and separate keys for testing and production. Then you can revoke one key without stopping everything else.
- Revoke a leaked key at once, create a new one and deploy again.
Step 3: Put brakes on costs and abuse
Your function has a public address. Anyone can call it — not only your page, but also scripts and bots — and every call costs you tokens. The OWASP Top 10 for LLM Applications 2025 lists this risk as “Unbounded Consumption”. It includes attacks that aim to drive up your bill, sometimes called “denial of wallet” (Source: OWASP Gen AI Security Project, genai.owasp.org). Several brakes in a row keep the risk small:
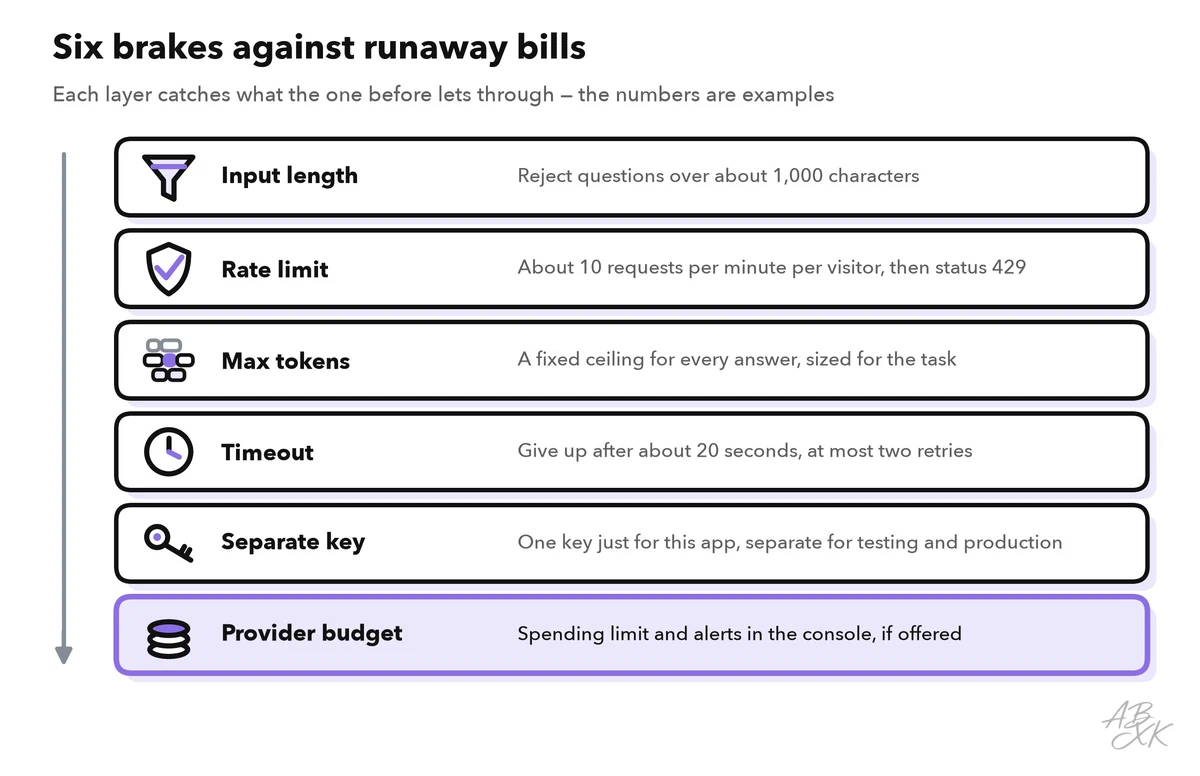
Rate limiting means a cap on how many requests one visitor may send in a given time, for example ten per minute. A serverless function may run as several separate copies that share no memory, so a simple counter in the code does not work. Use a rate limit setting of your platform, if it offers one, or count requests in a small shared database, such as a key-value store. Over the limit, the function answers with status 429, as you know from part 1. If many people use your app, a login or a bot check in front of the function helps as well. Our AI Security section covers abuse and defenses in more depth.
The last brake sits at the provider. Many model providers let you set a spending limit or alerts in their console. Set both before you share the link.
Step 4: Use your own domain with HTTPS
HTTPS encrypts the connection between the browser and your app. Browsers warn about pages without it. Most hosting platforms give each project an address with HTTPS from the start, for example a subdomain of the platform.
For your own domain, add it in the platform’s settings. The platform then shows you the DNS records to create at your domain registrar, often a CNAME or an A record. DNS is the address book of the internet: it translates a domain name into the address of a server. Changes can take some time to spread. Once the domain points to the platform, the platform requests a certificate for HTTPS, often from the nonprofit certificate authority Let’s Encrypt, and renews it automatically. Certificates expire after a set time, so automatic renewal matters. If you run your own server, check that the control panel renews certificates automatically, too.
Step 5: Watch logs and costs after launch
Every console.log line of your function appears in the platform’s function logs. Log what you need to find errors and control costs: time, status, duration, token usage, and the model and prompt version. Do not log full questions and answers by default, because they can contain personal data. If you need examples for quality checks, tell your users, keep only a few and delete them after a fixed time.
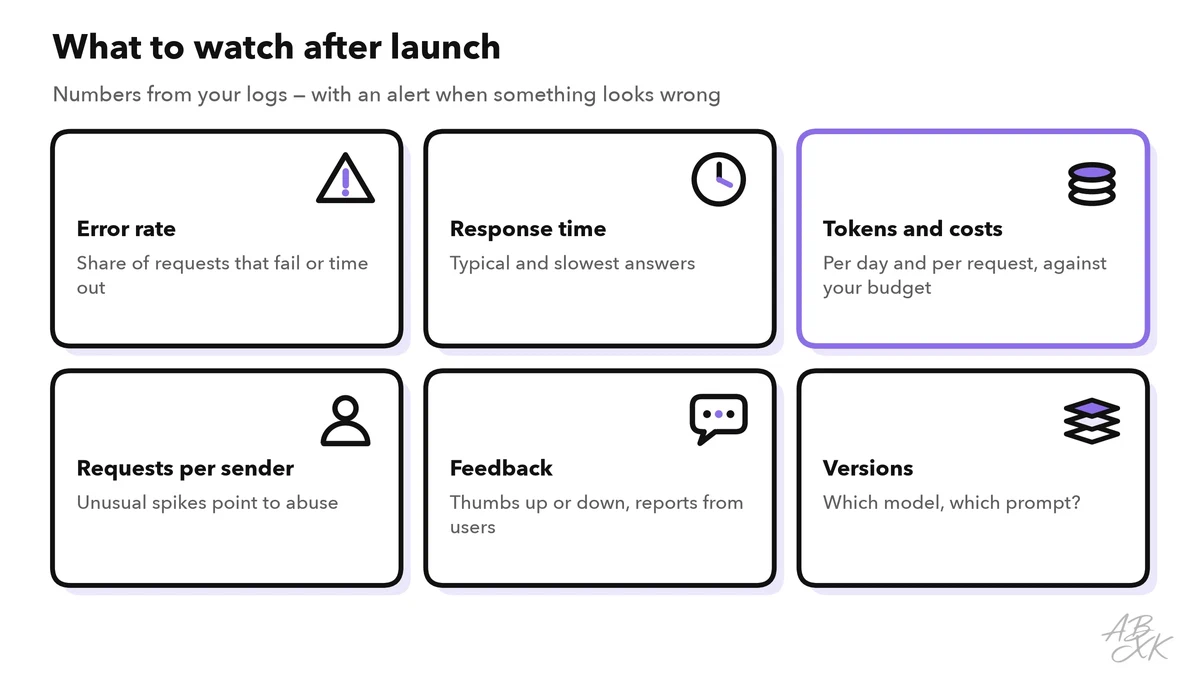
In the first weeks, look at errors and costs every day. Then set alerts, for example when the error rate jumps or the daily costs pass a limit you choose. Level 3 explains observability for LLM apps — logs, traces, dashboards and quality checks — in depth.
Launch checklist
Go through this list before you share the link, and again whenever you change the model, the prompt or the hosting:
| Area | Check |
|---|---|
| Key | Only in environment variables; a separate key for this app; not in the repository, the page or the logs |
| Input | Empty and overly long questions are rejected before the model call |
| Limits | Rate limit per visitor, max tokens and a timeout below the platform’s limit |
| Costs | Spending limit and alerts at the provider; token usage per day visible in your logs |
| Errors | Friendly messages for users; no internal details in responses |
| Privacy | Users know they are talking to an AI; your privacy policy names the model provider; no full texts in the logs without a reason |
| Domain | HTTPS works on every address; the certificate renews automatically |
| Rollback | You know how to go back to the previous deploy; many platforms keep earlier versions for this |
| Owner | One person reads the alerts and decides what happens when something goes wrong |